If you're a member of the iPhone Upgrade Program, you can easily upgrade your old iPhone to a new one every year with the coverage of AppleCare+. For whatever the reason you have, getting a new iPhone always sits there itching your pocket.
Once you get a new iPhone, among many initial tasks, to transfer photos from one iPhone to another seems a unceasing topic. In this tutorial, we'll show you how to transfer photos from your old iPhone to a new iPhone. Also If you'd like to learn how to send your photos to / from other friend's iPhone, it helps too.
Tutorial Summary:
- Part 1: How To Transfer Photos from iPhone to iPhone with iCloud Photo Library
- Tip: What Are The Differences between iCloud Photo Library and My Photo Stream
- Part 2: How To Transfer Photos from iPhone to iPhone with My Photo Stream
- Part 3: How To Transfer Photos from iPhone to iPhone with iCloud Photo Sharing
- Part 4: How To Transfer Photos from iPhone to iPhone with Photos App and iTunes
- Part 5: How To Transfer Photos from iPhone to iPhone with SyncBird
- Part 6: How To Transfer Photos from iPhone to iPhone with AirDrop
- Part 7: How To Transfer Photos from iPhone to iPhone with iMessage / Email
Part 1: How To Transfer Photos from iPhone to iPhone with iCloud Photo Library
Apple gives several options to transfer our photos from one iPhone to another. The most commonly used methods are using iOS in-built iCloud Photo Library or My Photo Stream to let iCloud handle with the photo library syncing. It is apt to get confusing on these two iPhone to iPhone Photo Transfer solutions without taking a close look, so here are some main differences between iCloud Photo Library and My Photo Stream.
Tip: The Differences between iCloud Photo Library and My Photo Stream
iCloud Photo Library
- Store all your photos all your photos and personal video and has no limits as long as you have the iCloud storage space.
- Photos stored on iCloud Photo Library take space on your iCloud storage.
- Access your photos on iPhone, iPad, Mac, and online via iCloud.com
- Stores full-resolution photos on the iCloud and on your devices and supports many file formats including JPG, RAW, PNG, GIF, TIFF, and others.
- Uploads and syncs iPhone photos and keeps your albums, slo-mo videos, panoramas, social media posts, and more.
- You can not sync albums and photos from your Mac or PC via iTunes when using iCloud Photo Library, and any existing albums will be removed when you enable the service
My Photo Stream
- Only stores your most recent 1000 photos or the last 30 days of images, whichever is greater
- Does NOT count on your iCloud storage.
- Photos could be access across all your devices including iPhone, iPad, Mac, and PC
- Stores storage-optimized versions of your photos, which may be in low image quality.
- Does NOT upload and sync videos
- You can still sync photos and albums from your Mac or PC via iTunes when Photo Stream is enabled.
Steps to Transfer Photos from iPhone to iPhone with iCloud Photo Library
The reason you can transfer photos from one of your iPhones to another is that iCloud Photo Library automatically keeps every photo and video you take in iCloud. As your photos and videos stay organized into Moments, Collections, and Years, so you will be able to quickly find the photos / albums after the transferring. Here are the detailed steps about how to transfer photos from iPhone to iPhone with iCloud Photo Librart.
STEPS:
- Log in iCloud with the same Apple ID on both of your iPhones.
- On your iPhone, go to Settings > [your name] > iCloud > Photos, then turn on iCloud Photo Library.
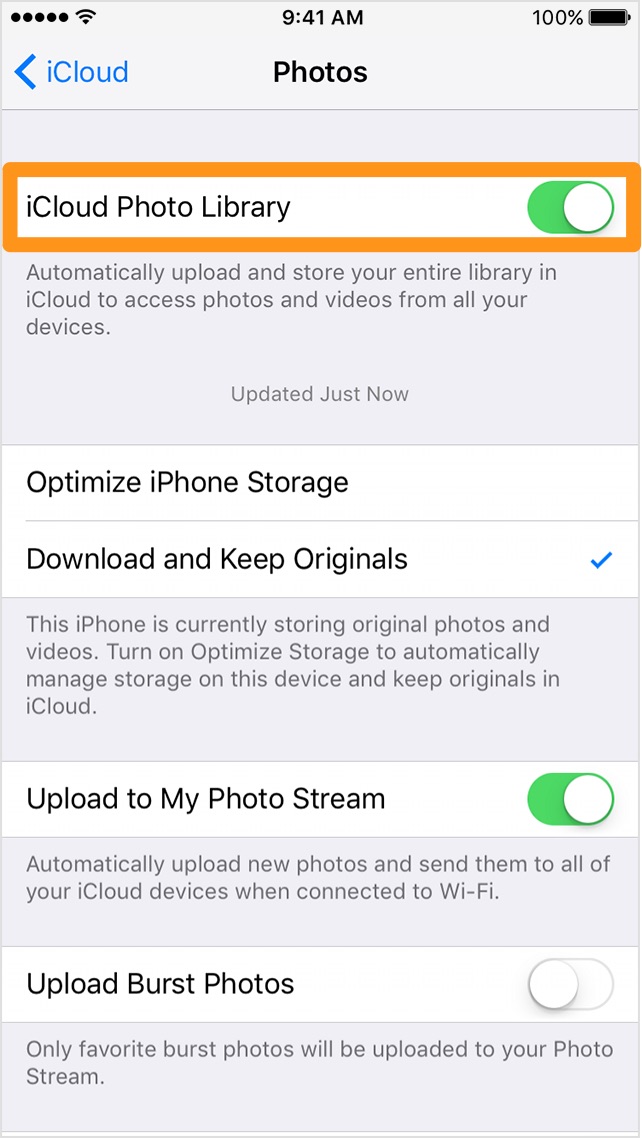
How To Turn on iCloud Photo Library
Frequently Asked Questions about iCloud Photo Library
When uploading or downloading photos via iCloud Photo Library, will it use cellular data?
No. Your photos upload to iCloud each time your iPhone connects to Wi-Fi and your battery is charged. It means, you cannot transfer photos from iPhone to iPhone manually with iCloud Photo Library.
Will iCloud Keeps The Original Image Quality?
Yes. If you turn on Download Originals, iCloud Photo Library keeps your original, full-resolution photos and videos in iCloud and on your device.
Part 2: How To Transfer Photos from iPhone to iPhone with My Photo Stream
Similar with iCloud Photo Library, My Photo Stream in iOS also helps if you want to send / sync photos from one iPhone to another. My Photo Stream uploads your most recent photos (except Live Photos) so you can view and import them to all of your devices. Photos are stored in My Photo Stream for 30 days. Here are the detailed steps about how to transfer photos from iPhone to iPhone with My Photo Stream.
STEPS:
- Log in iCloud with the same Apple ID on both of your iPhones.
- For iOS 10.3 or later, tap Settings > [your name] > iCloud > Photos, then turn on My Photo Stream. For earlier versions of iOS, tap Settings > iCloud > Photos, then turn on My Photo Stream.
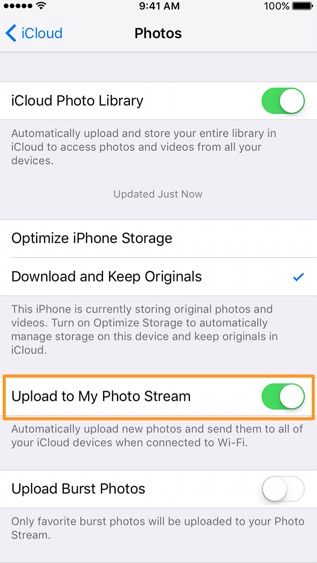
How To Turn on My Photo Stream
Part 3: How To Transfer Photos from iPhone to iPhone with iCloud Photo Sharing
With iCloud Photo Sharing, you can send and share photos from your iPhone to your friends’ iPhone (and other Apple device that signed with an iCloud account). Invite up to 100 of your favorite people to join in, make comments, and even add their own shots. Then you can manage your shared album and permanently save any photos that your friends add. To turn on iCloud Photo Sharing, follow steps below.
STEPS:
- Log in iCloud with the same Apple ID on both of your iPhones.
- On your iPhone, go to Settings > [your name] > iCloud > Photos, then turn on iCloud Photo Sharing. In iOS 10.2 or earlier, go to Settings > iCloud > Photos.

How To Turn on My Photo Stream
Part 4: How To Transfer Photos from iPhone to iPhone with Photos App and iTunes
If you're not a fan of iCloud service, or you are more familiar with transferring photos from iPhone to iPhone on computer, you need to two seperate app to accomplish the task. With Photos app (for macOS and Windows 10), you can import photos from iPhone to your computer, and after that, use iTunes to upload photos from computer to your second iPhone.
Import Photos from iPhone to Computer:
- Connect your iPhone (with the photos you want to transfer) to your computer > Open Photos app.
- Click Import > Select photos you want to transfer from one iPhone to another > Click Import Selected to starting copying photos from iPhone to your computer (Use Import All New Photos if you just want to get the new photos off your iPhone).
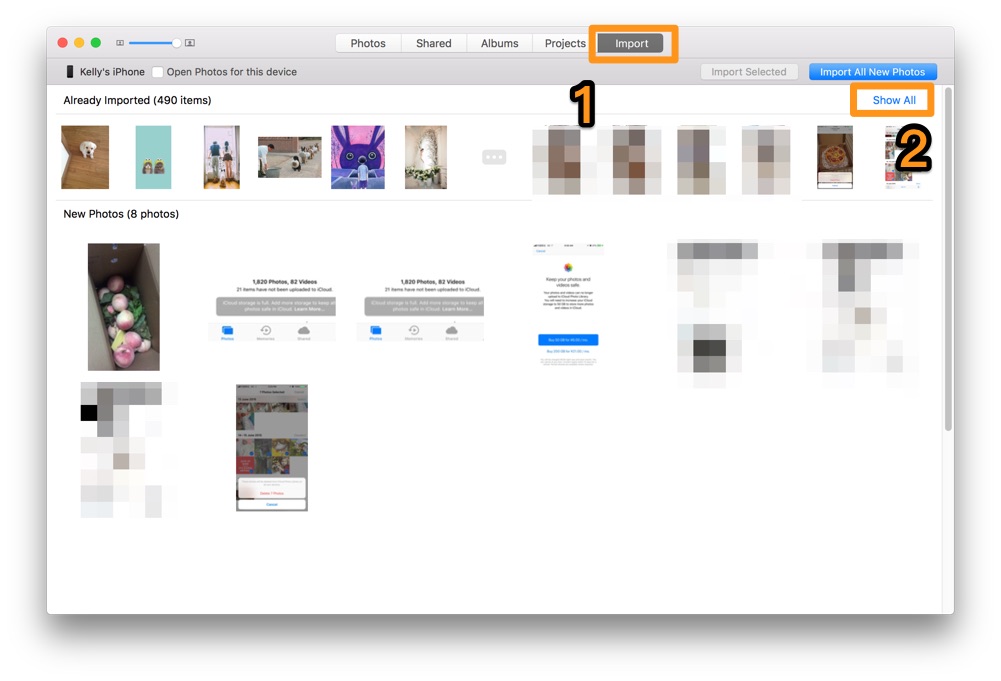
Import Photos from iPhone to Computer
Upload Photos from Computer to Another iPhone:
- Connect your second iPhone to your computer > Open iTunes.
- Create a folder on your computer and put photos you've imported from previous iPhone onto that folder.
- To sync photos from your computer to your device via the iTunes software, connect your device to a USB port on your computer and boot up iTunes. Then in iTunes, an icon for your iPhone or iPad should appear at upper left.
- Set Copy Photos from [THE FILE FOLDER YOU CREATED IN STEP 2] > Click Done to start syncing photos from computer to your iPhone.
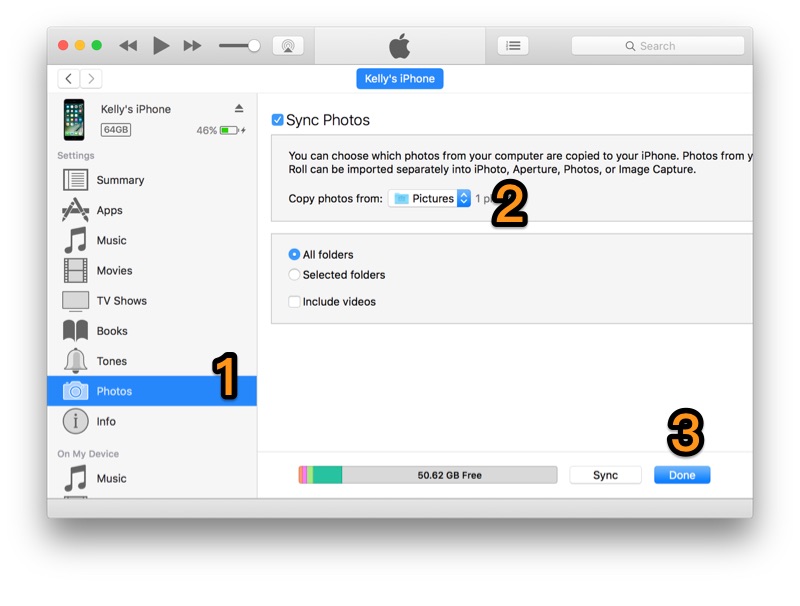
Sync Photos to iPhone with iTunes
Note: Remember that, to sync photos from iTunes to your iPhone, you have to turn off iCloud Photo Library first.
Part 5: How To Transfer Photos from iPhone to iPhone with SyncBird
SyncBird is a new and free desktop app that brings the ultimate iPhone to iPhone Photo Transfer solution. With it, you can straightforward transfer photos from one your to another with the most simlplied method. Free download SyncBird on your computer to have a try.
STEPS:
- Connect both of your iPhones to your computer > Open SyncBird app.
- Click Photo tab on the left side.
- Choose Photos > Click Send To Device to start transferring photos from one iPhone to another.
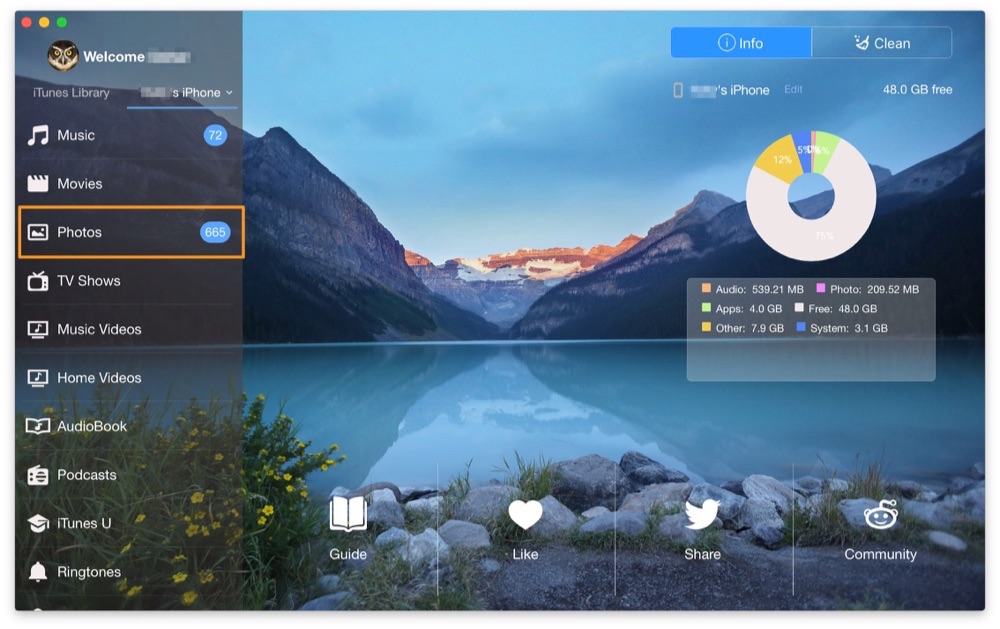
Transfer Photos from iPhone to iPhone with SyncBird
The Bottom Line
Have you successfully send photos from your iPhone to another one with above methods? Sure, in certain circumstances, you can also rely on AidDrop, iMessage, Whatsapp, or Email to send your photos, and we'll not discuss these methods in this tutorial. Leave a comment if you have any troubles.

